
Contents

Techpacker Pro-Series brings you value fashion content from our list of fashion industry experts to enrich your know-how on fashion production, technology and retailing.

Tuesday, March 14th 2017
Assuming you have defined the style, set up the sketches and materials page, the next step is measurements. Hopefully you have familiarity with writing measurements specs, some pattern & grading experience, and understand fit. If you do this is great, as your process for writing specs will shorten. So lets get down to the tips for setting up your workspace in Techpacker.
Tip 1: Format/ Organized Images
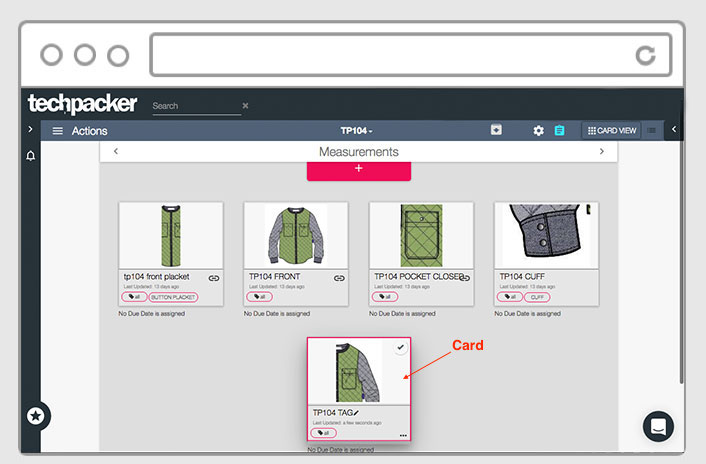
Format your cards (images). I generally like to have the front sketch, back sketch, side view, and any style specific areas like collar, pockets, hems, and more. I first focus on the image that will be across style, length measurements, and lastly the focal points like pocket, fly, plackets, collars, and more. The image below shows focal areas such as pockets, plackets, and cuffs. I like to separate these due to the fact that I can reuse cards like pockets on other styles, while not having to worry about changing measurements. This leads me to tip 2.
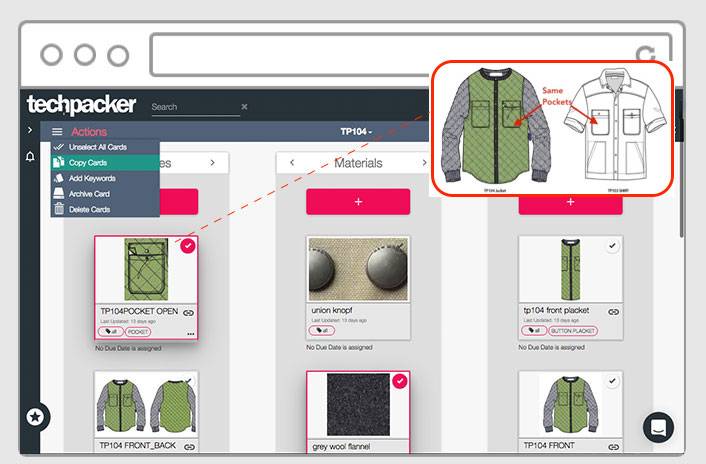
Tip 2: Benefits of Working with the Specific Cards
Techpacker allows the tech designer to separate the garment into specified areas, as pictured above. There are three key points to using the specific design spec cards. They are as follows
a) Reuse of the card for other styles: You can reuse the image and specs for other styles. For example a pocket, placket, or cuff can be saved and used again for a different style. This will expedite workload and time. It is as simple as copy and paste, or use the copy all tab at top left corner of the page.
b) Fit Analysis: During the fit process, teams can record notes in the comment section, and make modifications that are trackable. This is of benefit for the next time a style is executed. Or when a factory’s change. Tech designers can be reminded of any fit issues they had on the initial process, thus allowing for better communication between all teams. This can be done to each card vs. just the entirety of the garment. For example, if I used one image and drafted out all the specs, then fit sessions had notations, I couldn’t use the card as easily. The team may run the risk of call-outs getting lost in translation. Where as if the collar drop had to change I would just change that card. This also helps QC understand anything that may show up with collars fit down the line.
c) Quality Control Planning: A good techpack allows for easy quality control procedures. The techpacker cards can help QC teams inspect goods, as well as define any issues. For example, a garment that may have had some fit changes and comments made, will show up on the techpacker card. The QC planner can review information, and define any areas that might need a priority focus as a result. The image below shows the card image & spec sheet for the garment.
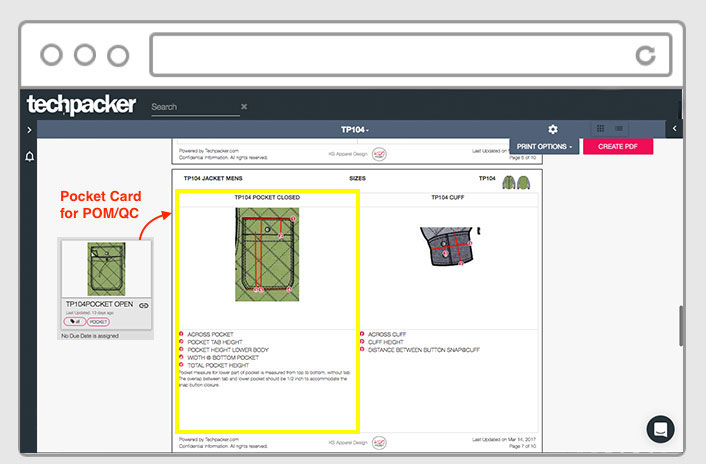
Images can be used for sample process, and QC process for production
POM Card that coordinates with Pocket Specs For pattern/sample development & QC
These three areas are also found in PLM programs that cost quite a bit more, and are sometimes more complex in the use. The way techpacker has arranged they way a designer can use these cards, makes the process much easier.
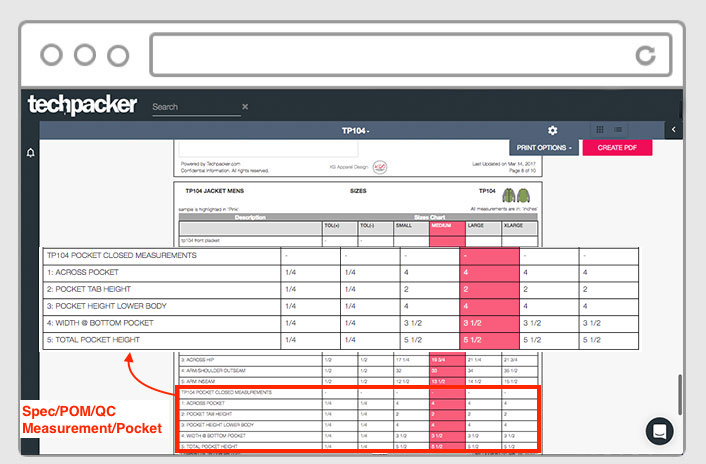
Tip 3: Using the Specs (POM) and Grade Rules
Depending on your company process, the grade rule area really allows you to have less sampling happen during product development. For example, many pattern drafters may use computer programs to develop the pattern. With the aid of specs/POM, the drafter can define the sample measurements, then input the grade rules developed in techpacker to create production samples. This will also shorten the time it takes for sampling to occur, and changes can be made accordingly. I have found these two aspects to be of use when working on specs, and grading.
Some tips on POM inputting process
a) Input all measurements for every size: For the beginning techpacker that is just learning, it’s a great way to get used to sizing. The process is also easy when the item is simple in design, and a one size fits all products.
b) Grade rules feature: The feature has simplified the process for sizing complex garments for my clients. It has also allowed for consistency in sizing. Once I save a card, the grading is also saved. Resulting in better sizing consistency to your brand.
Another reason why the grading is worth the additional membership is for updating any findings from consumers during line review. For example, the consumer feedback about fit of a style may call for longer inseams, and shorter rise. You can simply go to the leg card and adjust it. This will allow for all styles using the same card to be updated as well.
Note: If you're using grade rule, I suggest implementing the rules only after the production sample has been approved. This is mainly due to the adjustment process or any findings in fit sessions that may need to be considered before grading begins.
As an independent design consultant I can’t afford a PLM system that costs thousands of dollars, and not all manufactures can use it. Techpacker will cost very little, allow for anyone you link in your files to update and use, and act as a storage program. The system replaces the need to use various program platforms.
I can’t say enough about how easy Techpacker has made the techpack process.

The author of this post is katherine Schildmeyer. Her 20 years of experience in apparel has been on the design/manufacturing fence , also the retail management business end. Katherine has a track record of assisting brands with pricing, customs & HTC, design & merchandising, as well as brand image.