
Contents
This comprehensive guide will teach you the fundamentals of apparel pattern making from start to finish. Create a production-ready pattern, a personal pattern, and everything in between. You'll learn the fundamentals of pattern creation as well as common manipulations to achieve the ideal fit.
What is Pattern Making?
Pattern making is the process of creating a blueprint of your garment. A pattern is used as a template to cut out fabric that matches the required specifications to sew a garment. It factors in the type of fabric, the intended fit on the wearer, and any trims that will be used. The pattern is used to make 2D fabric sit properly on a 3D body.
Tools required for pattern making?
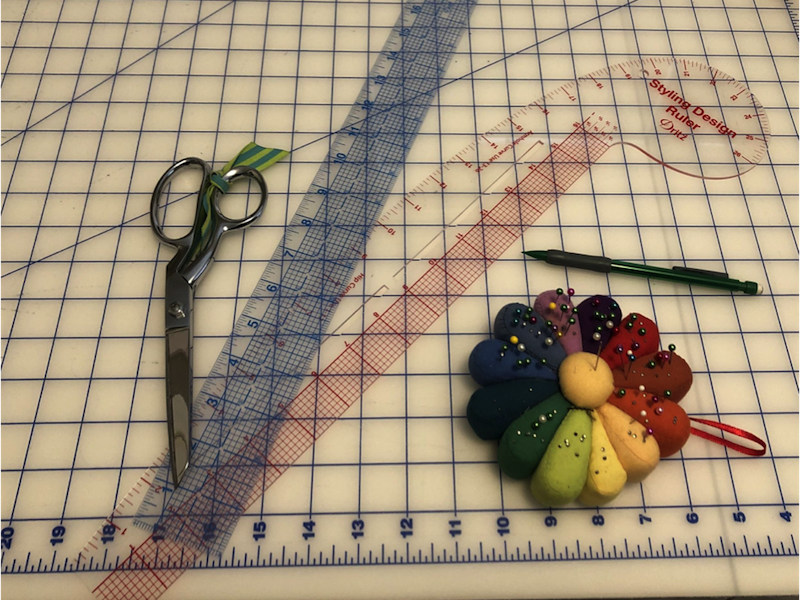
The most common methods of pattern-making are draping and flat pattern. Each method requires slightly different tools to get the job done.
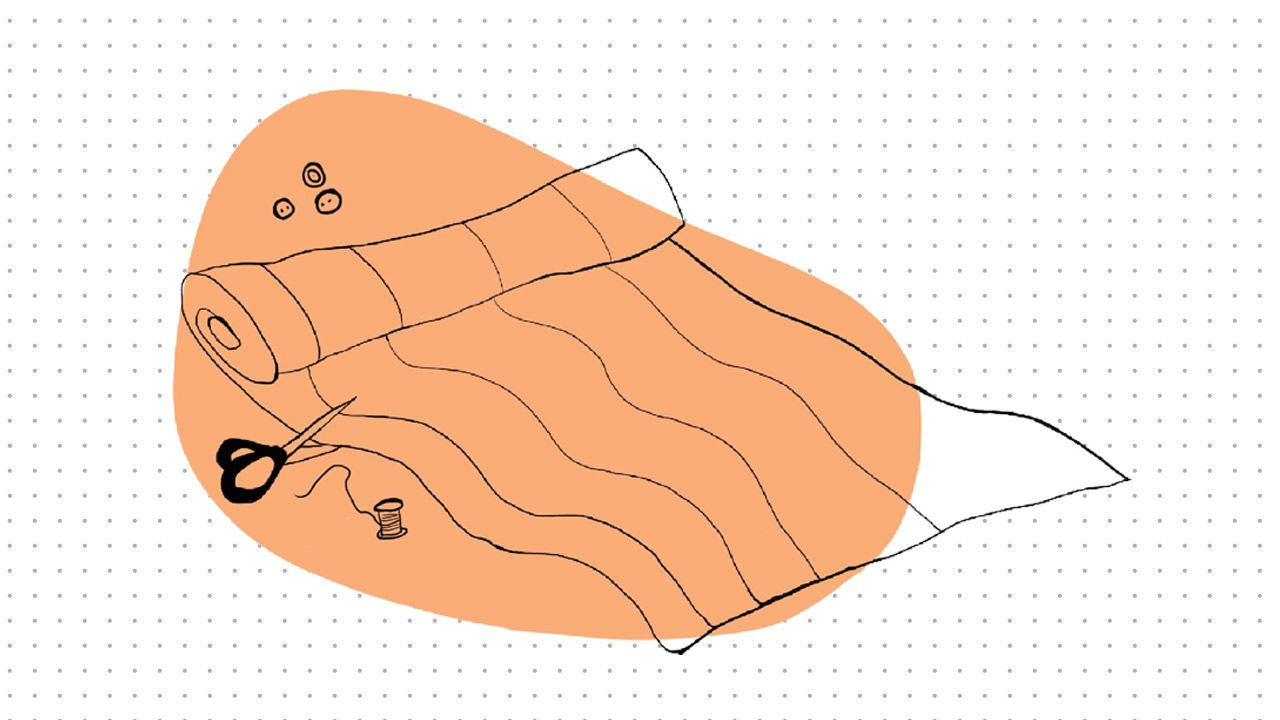
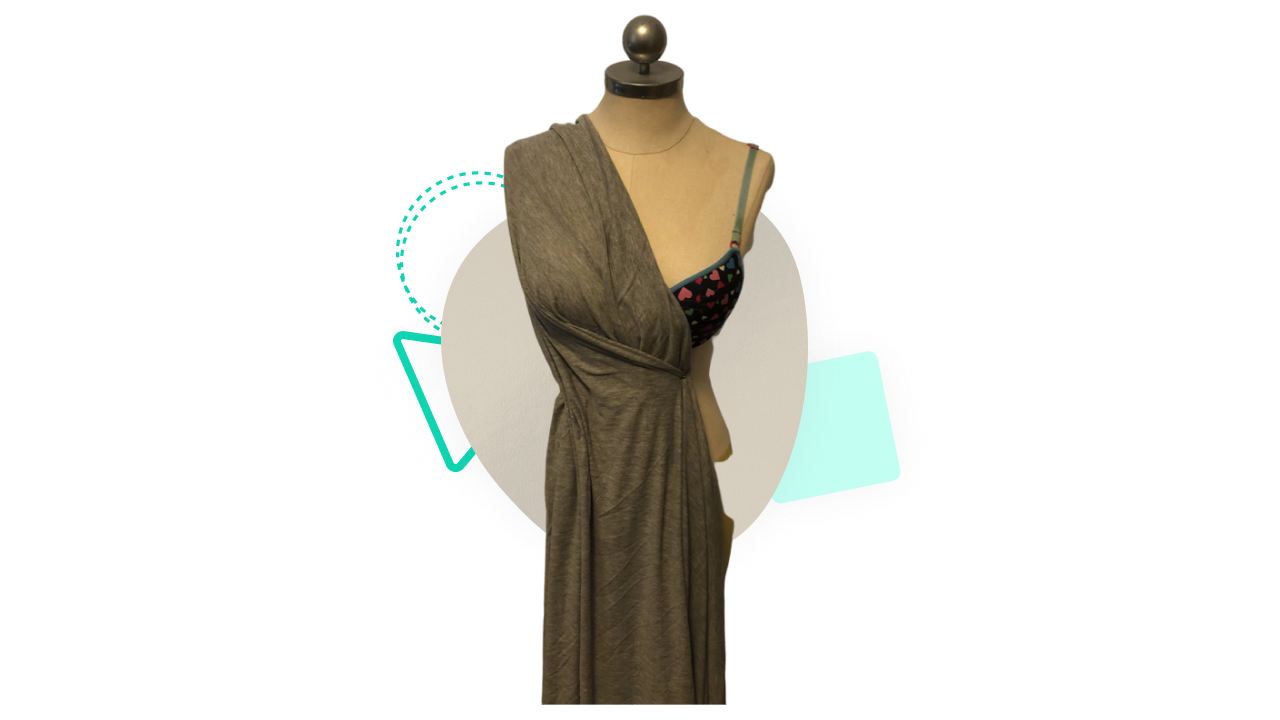
Draping is done by manually manipulating the fabric on a dress form so that it looks the way you want.
To get started, you’ll need a dress form, fabric (this can be your actual fabric or a less expensive fabric with similar weight and drape qualities), pins, pattern paper, a French curve, and a straight ruler.
The fabric is wrapped around the form until it is the desired shape, and then it is marked while still on the form. After that, the fabric is removed and spread flat. A French curve and ruler are used to clean up the lines. After that, the patterns are transferred from the fabric to pattern paper. After that, you would add seam allowance, notches, or any other necessary markings, and true your patterns. We'll go over what all of that means later.
While draping is a lot of fun, and can occasionally be necessary for very complex folds, it is not as efficient, nor as exact, as flat pattern.
The flat pattern is done on the flat, as the name implies. Pattern paper, a French curve, a straight ruler, and a pencil are used to create manual flat patterns. CAD software is used to create digital flat patterns. The drafting methods for creating flat patterns are the same whether you do it digitally or by hand.
Nowadays in the fashion industry, digital pattern making is becoming more popular than drafting paper patterns by hand. It is more precise, less time-consuming and it also allows you to preview the final design on the digital model, which can save up to 30% of sample-making costs. Fashion design software like Tukatech provides its customers with a large library of templates of 2D and 3D fashion patterns. This is a great learning opportunity for those fashion designers that are new to 3D design, as you won’t have to create patterns from scratch.
🖇 FREE EBOOK
How To Master Apparel Sizing and Measuring
Learn to figure out 📏📏 sizing and measuring right for your fashion products.
How do you determine your body measurements?
Using the correct body measurements is integral to creating a well-fitting garment. But how do you find the right body measurements? This depends on who you’re creating for!
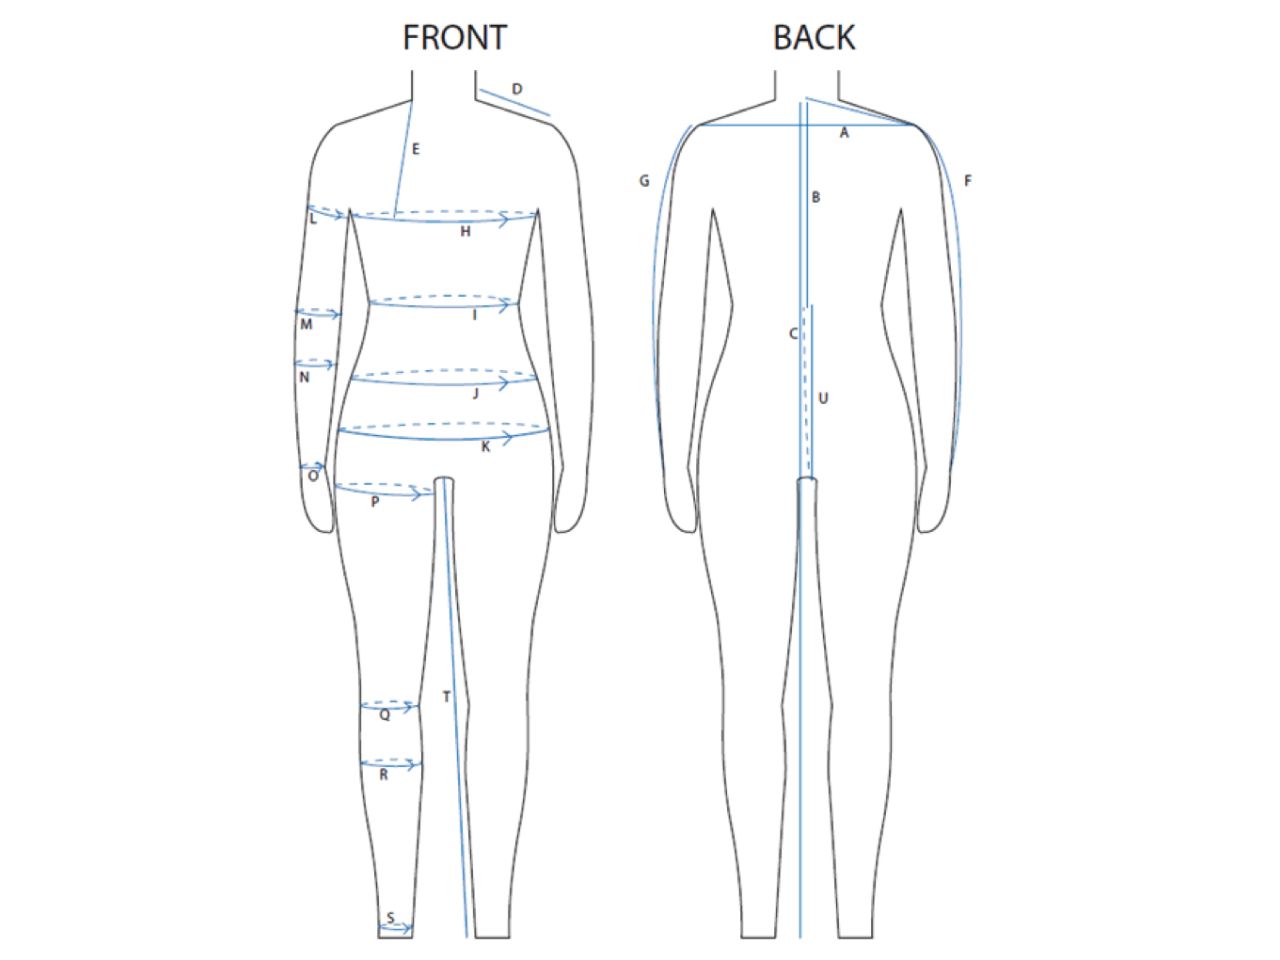
If you're making a custom garment for yourself or someone else, you should take the end wearer's actual body measurements and use those to create your pattern. Typically, a measurement sheet like this one would be used to record all of the necessary measurements.
But what if you’re making garments for mass market? You need a more general body measurement. There are several ways you can find proper body data to create the patterns you need. ASTM body data can be purchased through several different companies and is an amalgamation of hundreds of thousands of body scans. You can also work with third party body data consultants, such as Alvanon and Human Solutions, which will help you tailor your body data to your specific target market.
 Steph Thiel
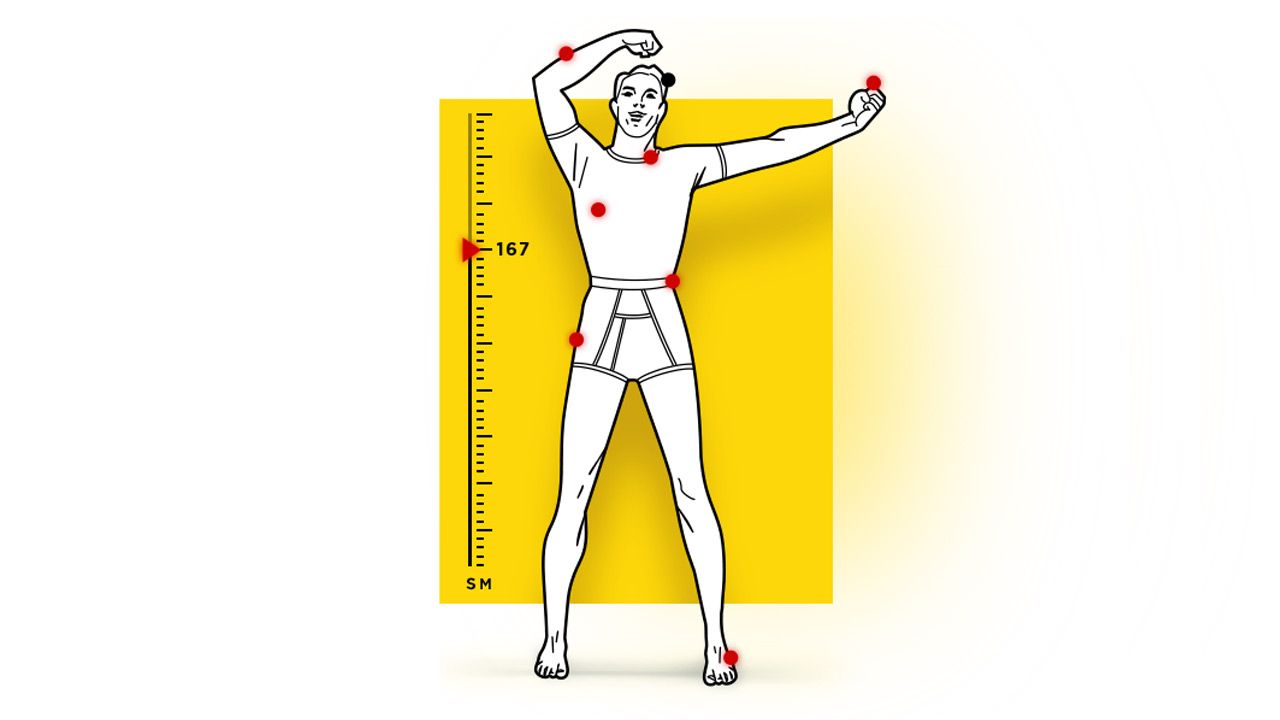
What is a basic pattern?
A basic pattern, also known as a block pattern, corresponds directly to body measurements and has no wearing ease. Basic patterns are critical for achieving fit consistency across a brand. Consistency in fit means that your customer can buy their size with confidence each time they buy a product from you, knowing that it will fit. Using a basic pattern library as a starting point for all of your style patterns is the best way to develop this confidence.
A solid basic pattern library will provide you with patterns that only have the necessary seams required for fit and the necessary amount of wearing ease required for the type of fabrics they are intended for. Design ease, additional design lines, and other design features can be added later on at a style level.
What is Garment Ease and why is it important?
You need to determine your garment ease now that you have your body measurements. The amount of difference between the body measurements and the garment measurements is referred to as garment ease. The garment ease determines how the garment fits against the body. A loose garment is more comfortable than a fitted garment. Some garments, such as athletic leggings, have negative ease, which means the garment measurements are smaller than the body measurements. Stretch fabrics are the only ones that allow for negative ease.
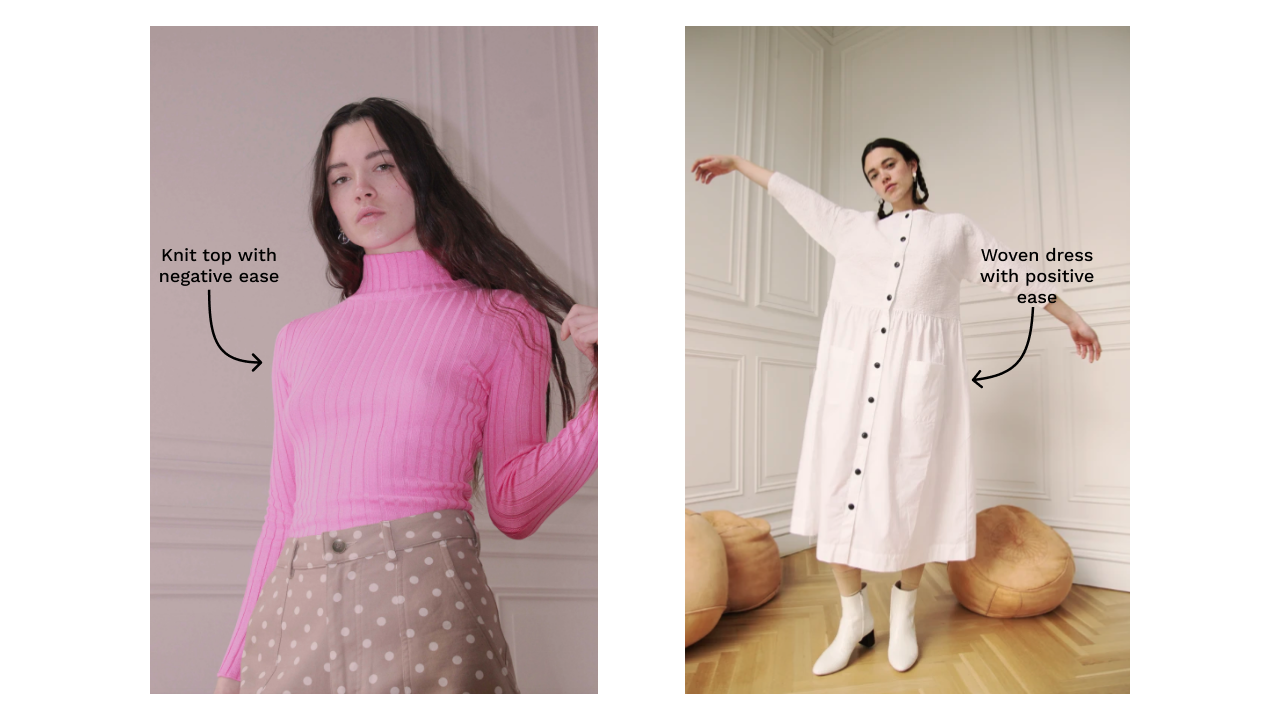
The garment ease is made up of two parts – wearing ease and design ease. Wearing ease is the amount of ease necessary to move in the garment. For example, a woven garment typically requires 3-4” of wearing ease at the bustline to appear and feel fitted on the body, while a cotton knit, may only require 1” of ease and a cotton/elastane blend knit can use negative ease at the bustline. Design ease is any additional ease on top of the necessary wearing ease to achieve the desired design. For example, if you want a loose woven garment, you would add additional ease on top of the needed wearing ease.
How do you determine your garment specs?
Once you have your body measurements and your design, you can start to determine your garment measurements or specs. Some of these measurements will come directly from your body data, while you’ll add the garment ease amount to others.
We will discuss how to come up with the garment measurements for this bell sleeve top.
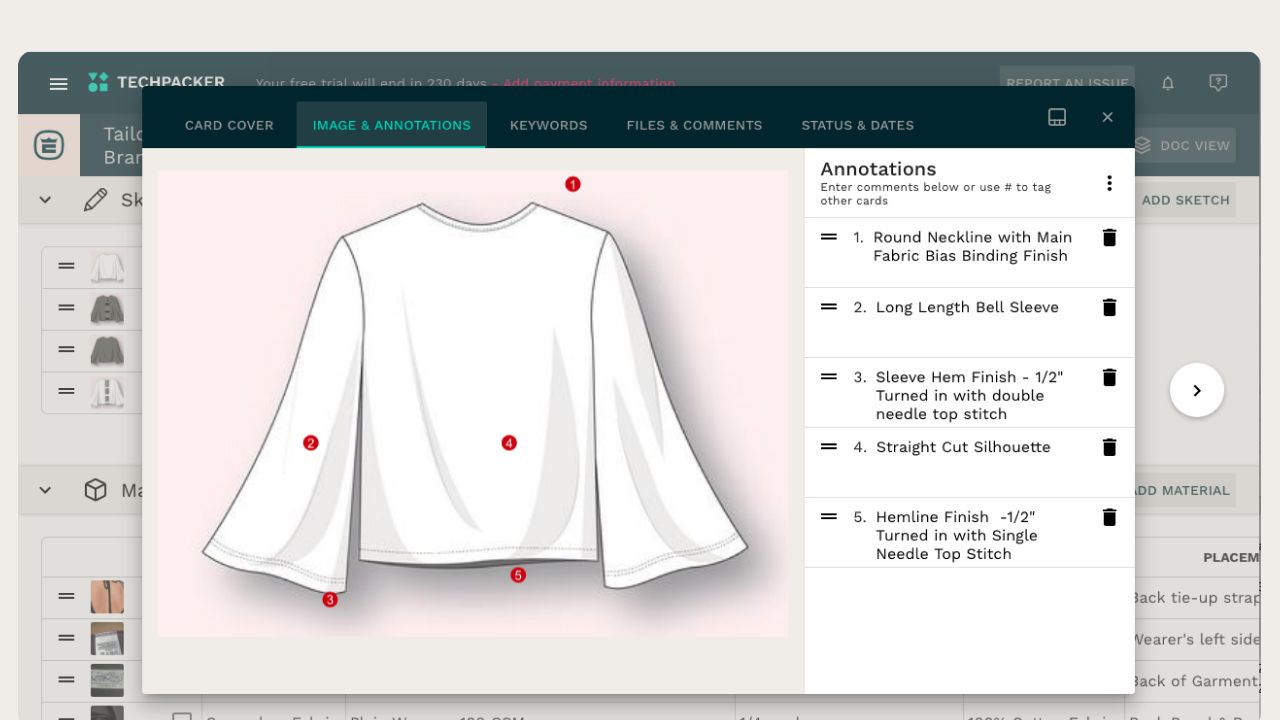
We can see by the sketch, that it’s a looser fitting garment, which means it will have a fair amount of ease, especially at the sleeve openings where it bells out. When you’re working on a top, the key measurements for how a garment fit are the chest, waist, hem, across shoulder, and how closely the armhole fits to the underarm.
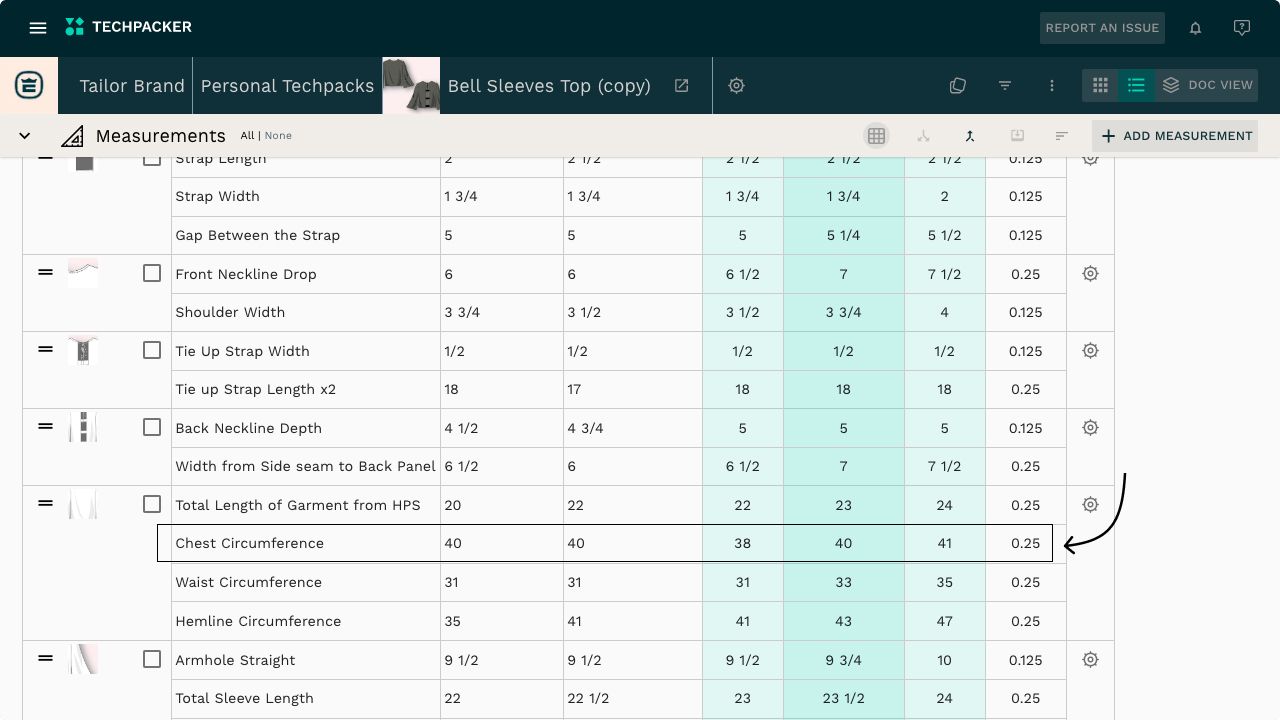
For the purposes of this tutorial, we will use a woven fabric for our garment. Woven fabrics require more ease than knits due to their lack of stretch. For a loose-fitting woven garment, we need 6-8” of ease at the bust. Our base size body has a chest measurement of 34”, so let’s use a 40” full chest width, or 20” half chest.
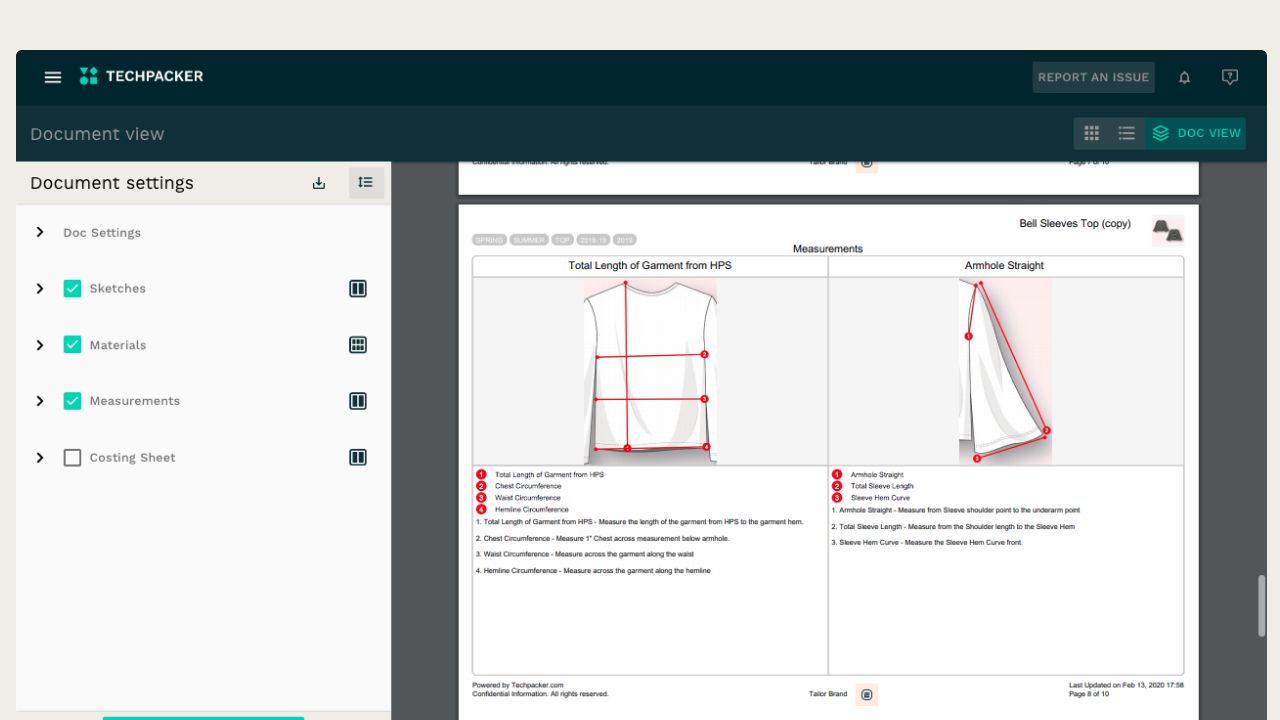
We would then go through all of the needed points of measure (POM) to create our full garment specs.
One thing to keep in mind when creating your specs is the tolerance needed in production. Tolerance is the amount over or under (often expressed as +/-) the spec that is acceptable for a garment to pass quality control.
There are several things in the sewing and construction process that can cause a small variance in the final garment measurements, so this needs to be considered in the specs. Typically, the larger body measurements like chest or hip have a tolerance of +/- ½” while the smaller areas like a sleeve width or neck drop will have much smaller tolerance amounts.
One thing to watch for in determining your tolerance amounts is to make them large enough to account for necessary variation in production, but small enough that you won’t get any overlap between sizes. For example, if your size S has an 18” half chest and your size M has a 19.5” half chest, you wouldn’t want a 1” tolerance because that means that in production you could have a size S with a 19” half chest and a size M with an 18.5” half chest. This causes confusion and inconsistency for your consumer. By limiting the tolerance to +/- ½” you ensure that your largest S is 18.5” and your smallest M is 19” ensuring there is no crossover.

💥 Our Partner Program
Become a Techpacker Certified Partner
And earn rewards while you are at it!
How to draft a flat pattern
There are a couple of different ways to draft your flat pattern – drafting the basic pattern is done entirely from measurements, while drafting a style pattern often comes from taking your existing basic pattern and manipulating it to match your garment specs and design.
Let’s start with the basic top pattern!
Using either your pattern paper and straight ruler, or your CAD program, create a rectangle that matches the total length of your top from center back (CB) neck to waist. This measurement should be taken directly from your body data. The width of the rectangle should be equal to ¼ of the total garment chest width. You will use this rectangle as a starting place to draft your bodice pieces. Learn the full basic pattern-building process here.
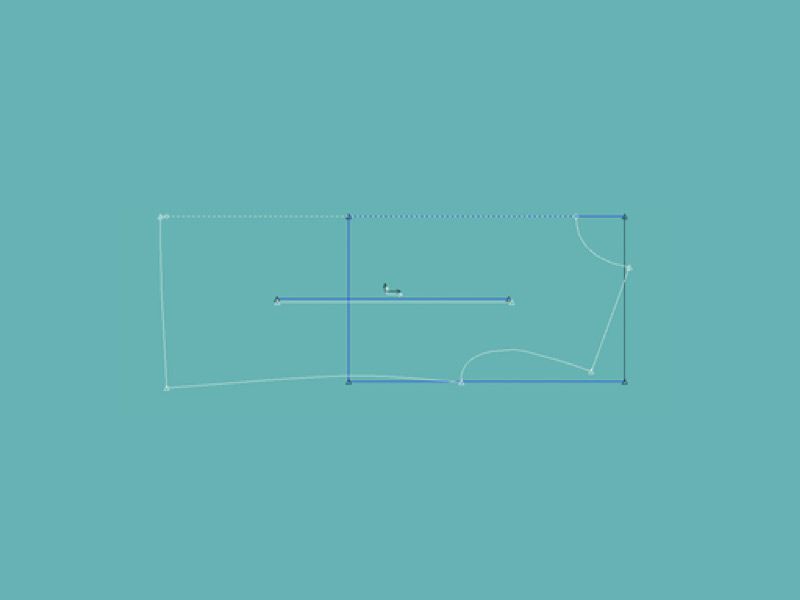
Once you have your basic patterns, you can create and endless amount of style patterns. For our example, we’ll reference the same bell sleeve top that we looked at earlier. If our basic pattern has a chest width of 37” and we want the full chest width to be 40” then we know we need to add 3” to our basic pattern. When we’re using a front or back bodice piece which is on the fold, we’re dealing with ¼ of the total body width measurement, so that means we need to add ¾” to the chest.
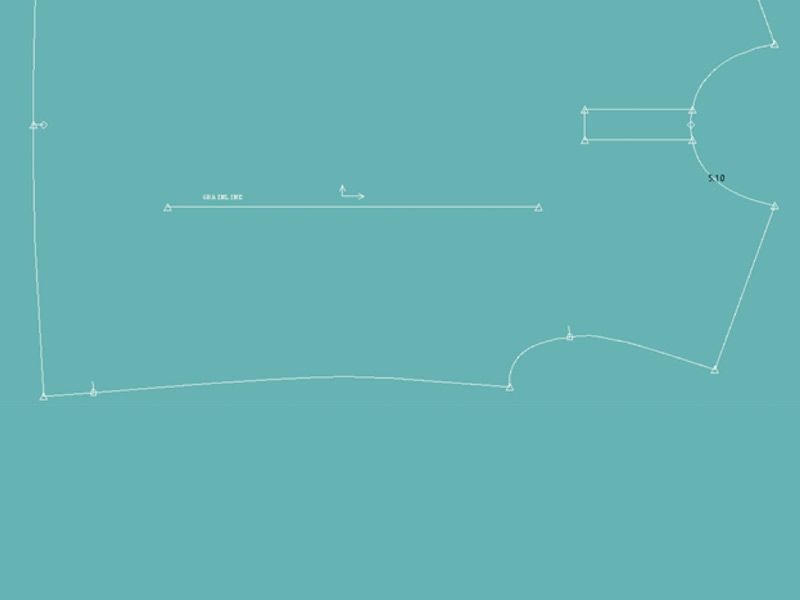
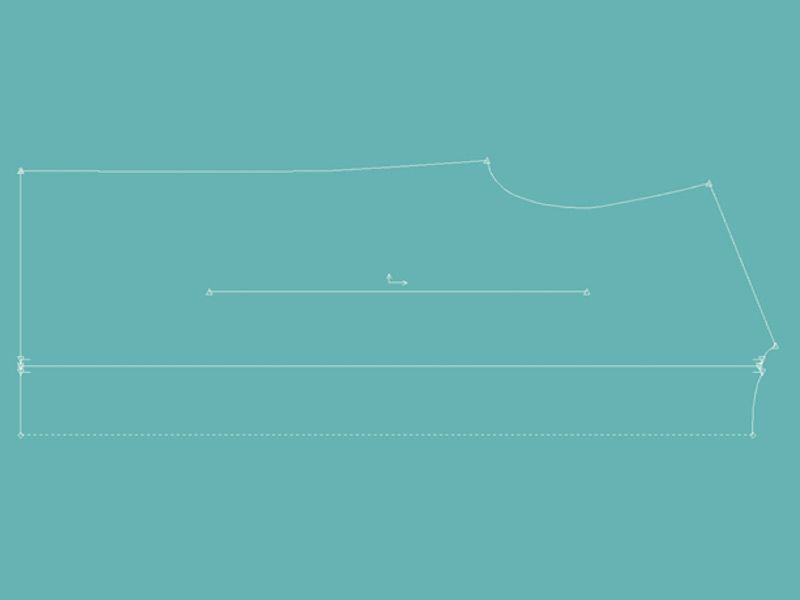
We’ll start by drawing a line straight over ¾” from the underarm point.
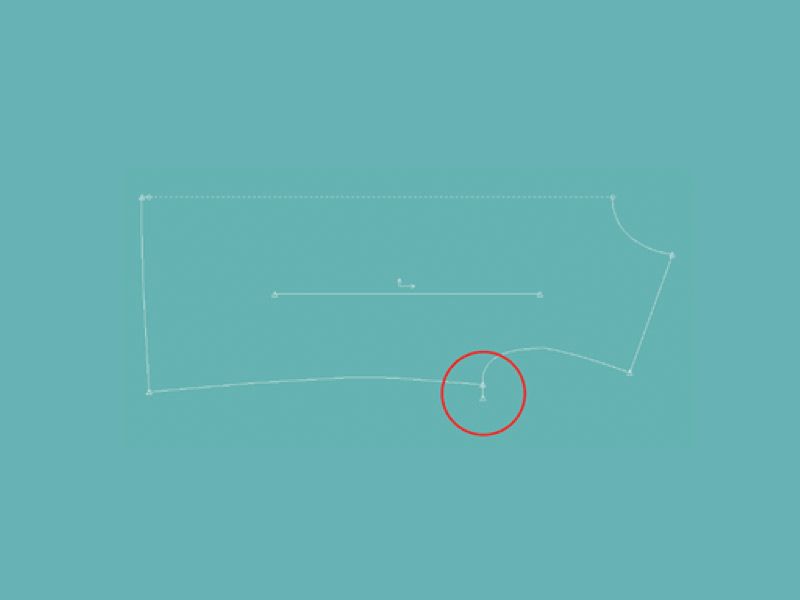
Because another big factor in how loose a garment feels is the fit around the armhole, we will also want to drop the underarm point a bit to create a wider armhole and therefore be able to accommodate a wider sleeve. We will draw another line ½” down from the line we just drew.

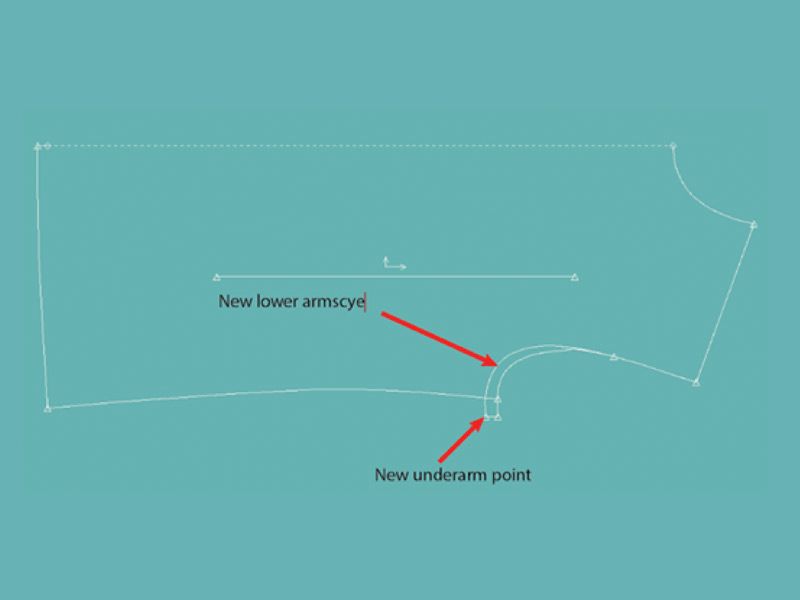
We can see in the sketch of our garment that the top of armhole appears to be sitting right at the shoulder point of the body, so we will keep the shoulder the same as our basic pattern. Now it’s a matter of playing connect the dots for our new front armhole. We want to keep the upper 1/3-1/2 of our armscye curve the same as the basic pattern and then change the shape of the lower portion to meet the new underarm point we created. If you are doing your pattern manually, you’ll use your French curve to create a smooth line.
You’ll repeat this to add additional width to your waist and hem, based on your garment measurements, to create your new side seam.
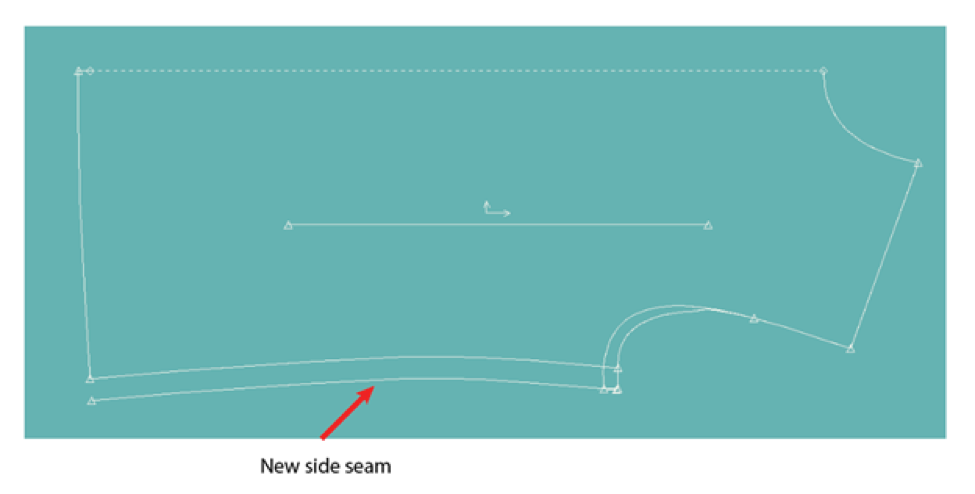
You’ll follow similar methods to make any additional adjustments, such as neckline shape and depth, body length, etc. Until all of your basic pattern pieces have been adjusted to match your garment specs and design sketch. Any unnecessary lines, like your old underarm or old side seam, can be deleted from the style pattern.
 Steph Thiel
Creating a production-ready pattern
|
Production readiness checklist: |
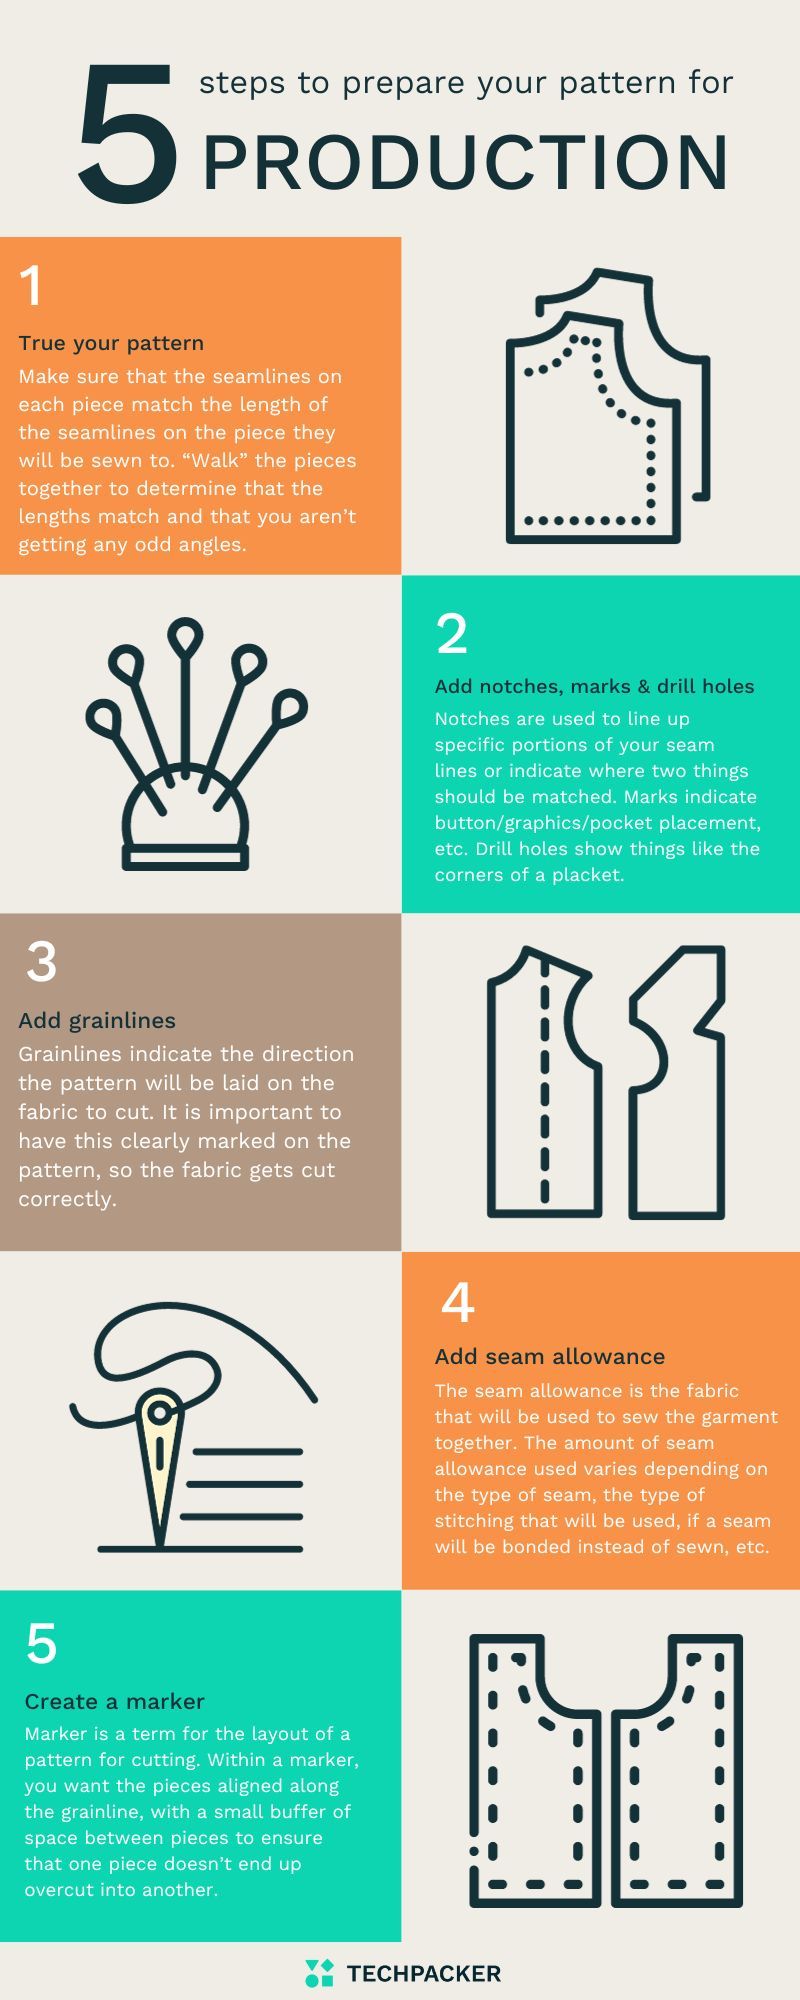
Trueing your pattern
The first step to finalizing your pattern is called trueing your pattern. This means making sure that the seamlines on each piece match the length of the seamlines on the piece they will be sewn to and that there are no strange angles at the top of bottom of the seams. For most portions of the garment, you’ll want these seam lengths to match exactly, but we’ll go over the exceptions to this later.
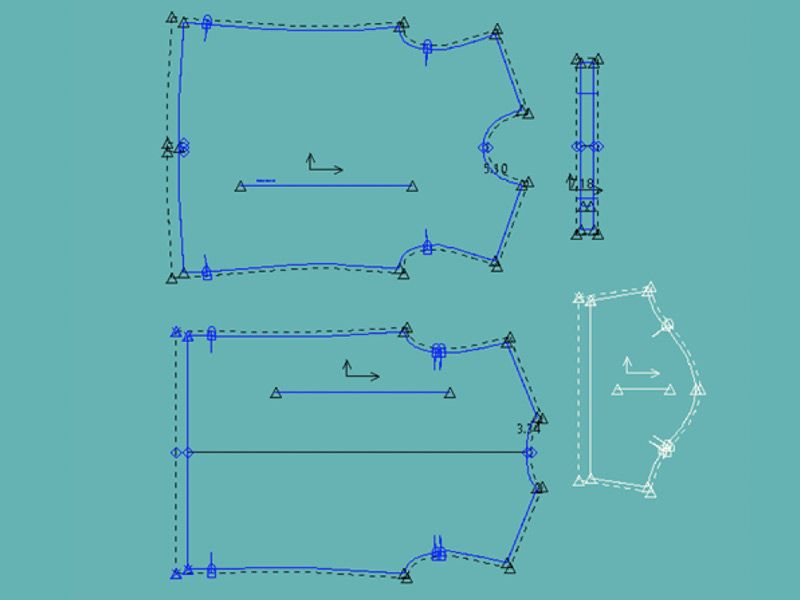
You will do what is called “walking” the pieces together to determine that the lengths match and that you aren’t getting any odd angles. You’ll start with two pieces aligned at one end of a seam – here you’ll see the side seams aligned at the bottom.
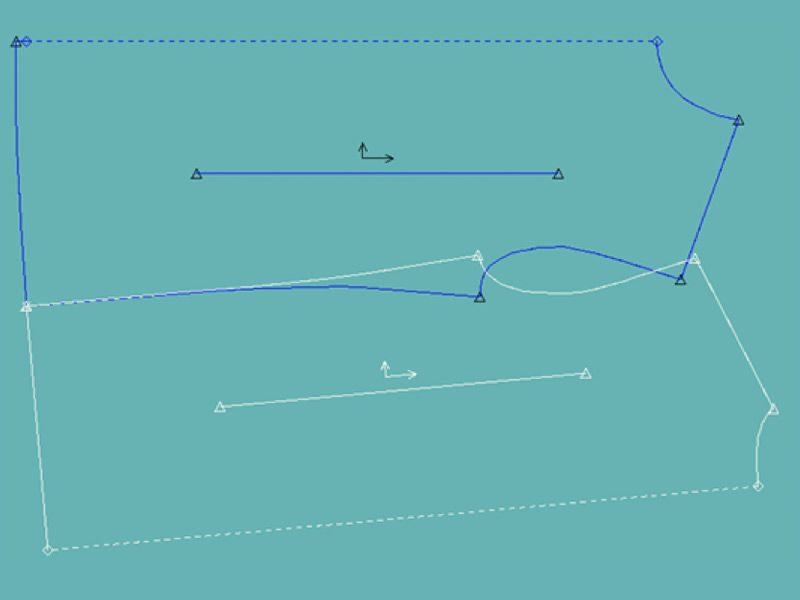
We can see that the pieces will sew together nicely at the bottom, without any steps or sharp angles. Now we will walk the remainder of the seamline together, ending at the top.
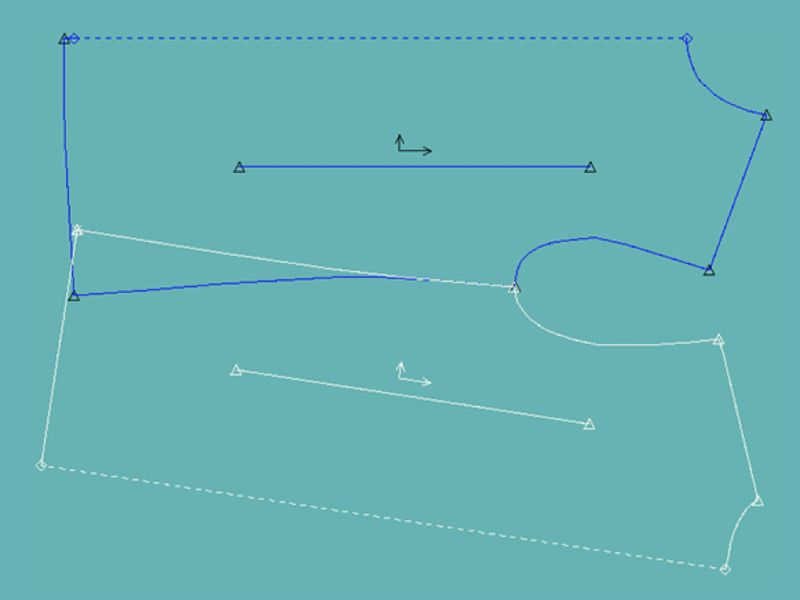
If we zoom in, we can see that the side seams aren’t quite the same length and that the curve shapes aren’t matching nicely.
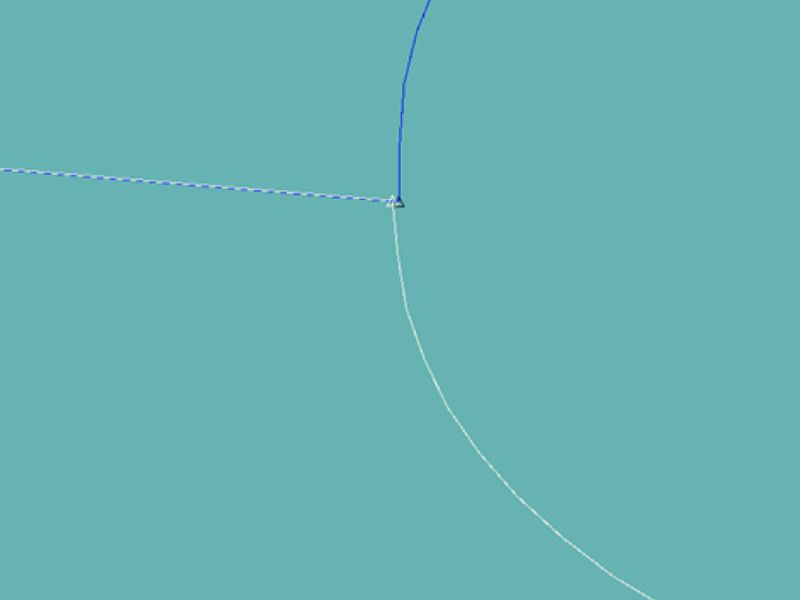
We will make a small pattern adjustment to correct this and make sure our pattern is nice and trued.
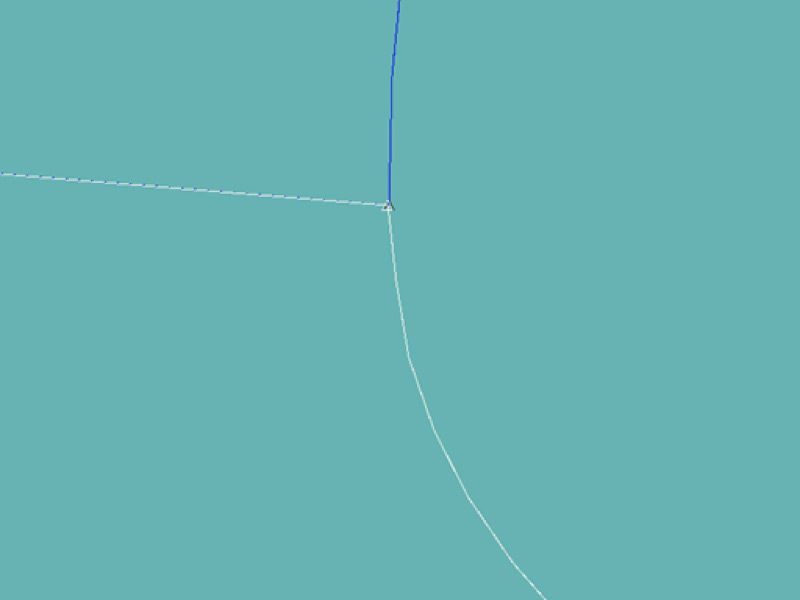
Walk each seam of the garment to ensure that all of your seams are trued and everything will go together nicely.
Exceptions to the rule:
As with any good rule, there are always some exceptions. If you have pleats or darts on your garment, the edge of the pattern piece with the darts/pleats will be longer than the one without. You want to close the darts/pleats as they would be once sewn, and then walk the pieces to ensure that the seams are trued.
Another exception is the shoulder cap on sleeves. Typically, a shoulder cap is slightly longer than the armscye you are sewing it to in order to ensure proper mobility and shoulder rotation for the wearer. This means that the shoulder cap will need to be eased into place while sewing.
Things like gathers, very curved design lines, etc. may also have a difference in the pattern edge lengths as part of the nature of the design.
Adding notches, marks, and drill holes
Notches, marks, and drill holes are used during the sample making and manufacturing process to show several different things. Notches are cut into the fabric and used to line up specific portions of your seam lines or indicate where two things should be matched.
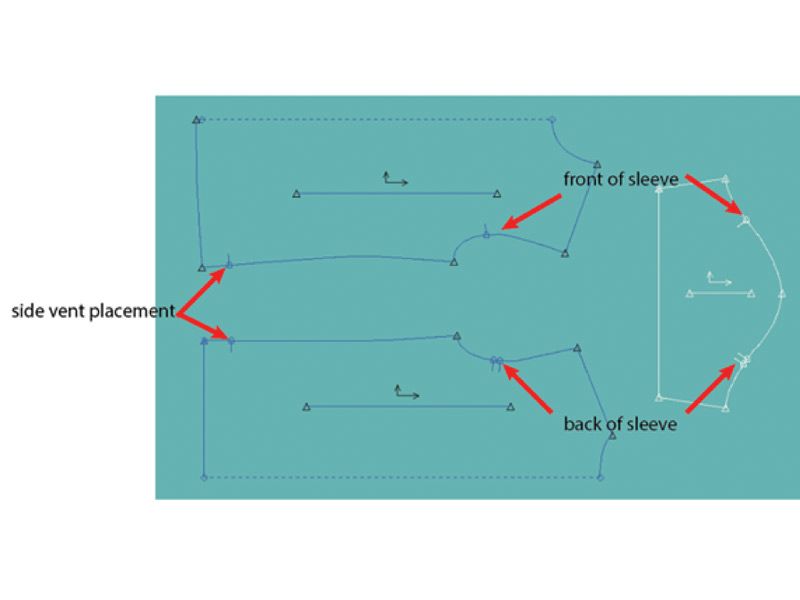
In the image below, you can see that there are notches used to show where the top of a side seam vent might be placed, as well as a single notch on the front armscye and front sleeve and a double notch on the back armscye and back sleeve. These are all there to help during the sewing process.
Notches are also used to align things like rib collars, which are cut smaller than the neckline they sew to, so that the garment can be stitched evenly. You can see here that the collar length is only about 85% of the length of the neckline. The notch indicated where to align the shoulder seam so that the collar is stretched the same amount and front and back.
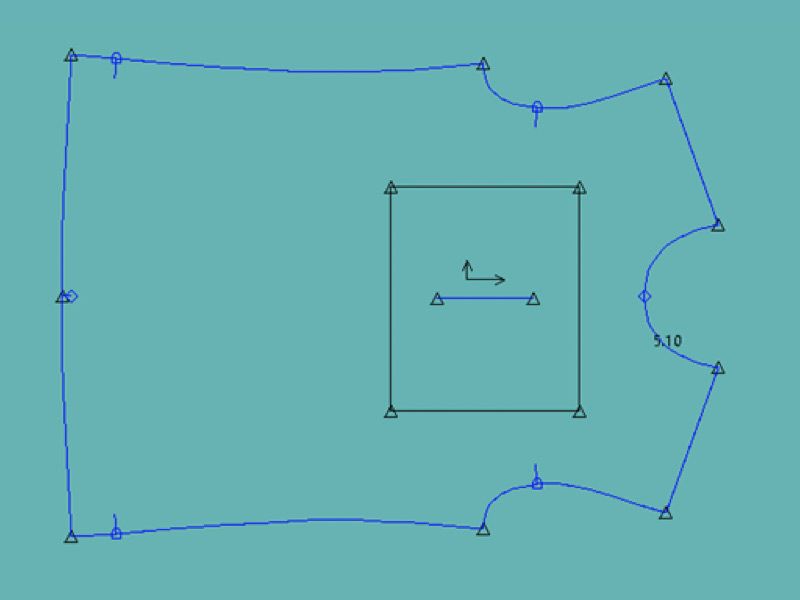
Marks encompass a lot of different things within pattern making. You can have marks which indicate button or snap placement, marks which indicate a graphic or logo placement, pocket placement for a patch pocket, etc. Marks are literally marked on the fabric, but NOT cut. The rectangular mark shown here is for screen print placement, to ensure that the garment is aligned properly before printing.
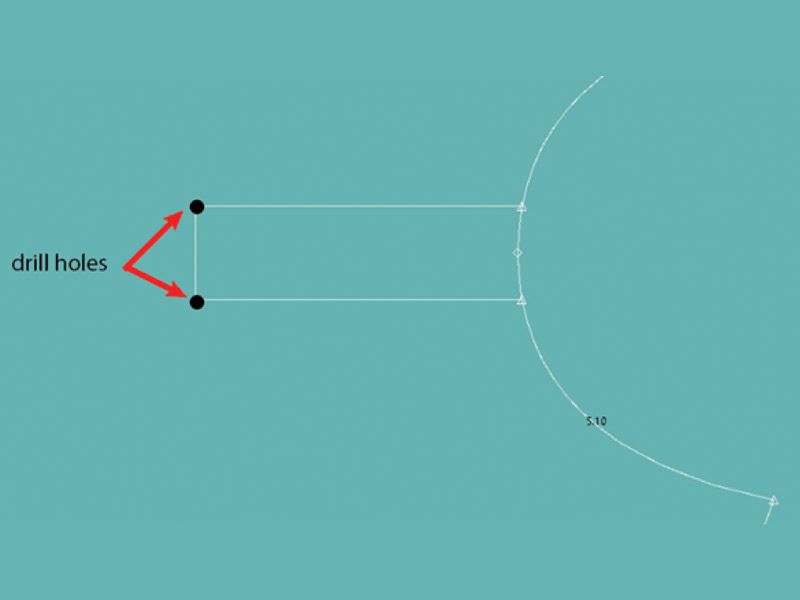
Drill holes are another important indicator on patterns. They are a small hole created to show things like the corners of a placket. When cutting out the pattern piece for a Henley collared shirt, for example, the Henley placket would be marked on the pattern with the corners drilled as holes. Later in the process of creating the placket, you could cut to the holes.
Grainlines
Grainlines indicate the direction the pattern will be laid on the fabric to cut. It is important to have this clearly marked on the pattern, so the fabric gets cut correctly. The grain effects the way a fabric drapes and stretches, as well as how a print or nap will execute when the fabric is cut. Typically, grainlines are indicated as a straight line along the pattern piece. For digital patterns, the grainline controls how the piece will be put into a marker (don’t worry, we’ll cover markers later on). If your pattern is a paper pattern, the line should be annotated with the word “grainline”.
Adding seam allowance
Now that our pattern is trued, marked, and notched, we need to add seam allowance (often abbreviated as SA) to the pattern. The seam allowance is the fabric that will be used to sew the garment together. The amount of seam allowance used varies depending on the type of seam, the type of stitching that will be used, if a seam will be bonded instead of sewn, etc.
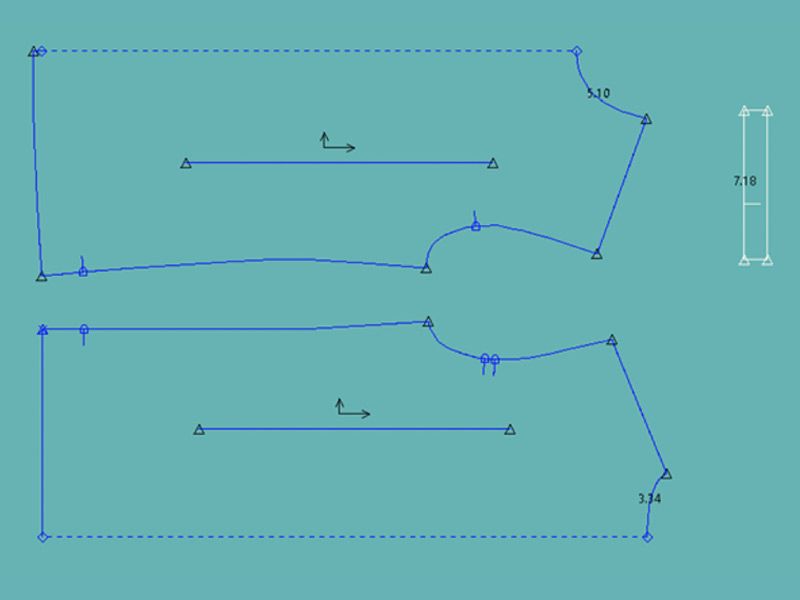
Most serged seams will be 3/8” or 1cm, while a hem is typically 1” or 2.5” allowance. Flatlock seam allowance is usually much smaller and will depend on the stitch width of the flatlock itself. For this pattern, I have simply added a standard 3/8” to all serged seams and 1” to the hem and sleeve openings. The dotted lines indicate where the fabric will be cut, while the solid lines indicate the stitching lines.
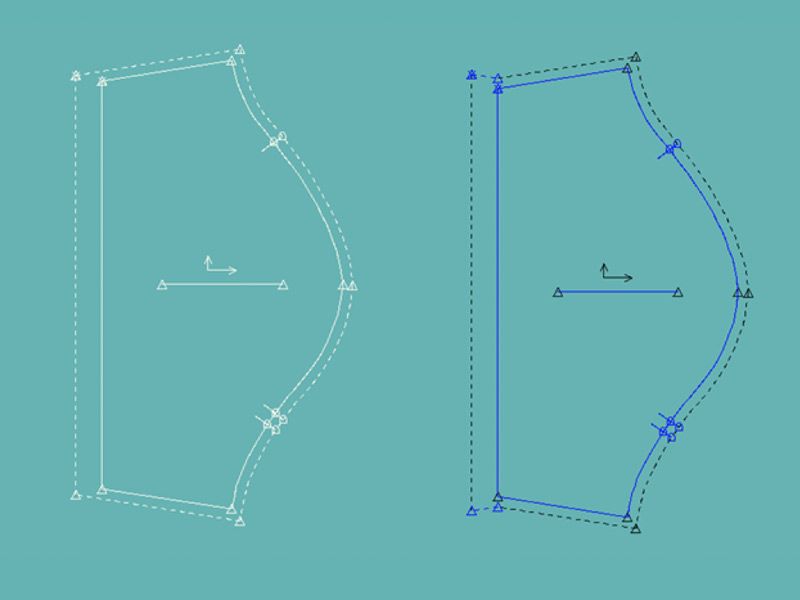
Depending on the shape of your pattern piece, you may need to manipulate the seam allowance at the corners to ensure that your pattern remains trued. One example of this is a turnback hem. You can see in the sleeve on the left that the seam allowance continues down, becoming narrower at the hem. When you try to fold this hem allowance up and sew it to hem, you would end up with puckering due to the fact that the cut edge is shorter than the sleeve width at the fold. On the sleeve on the right, you can see the turnback hem has been applied so the cut seam is a mirror of where it will stitch to.
There are several other types of corners which can be applied to seam allowances to keep them trued. Another very common type is a mitered corner, which is helpful for pieces which end in a very small, narrow point.
Creating a marker
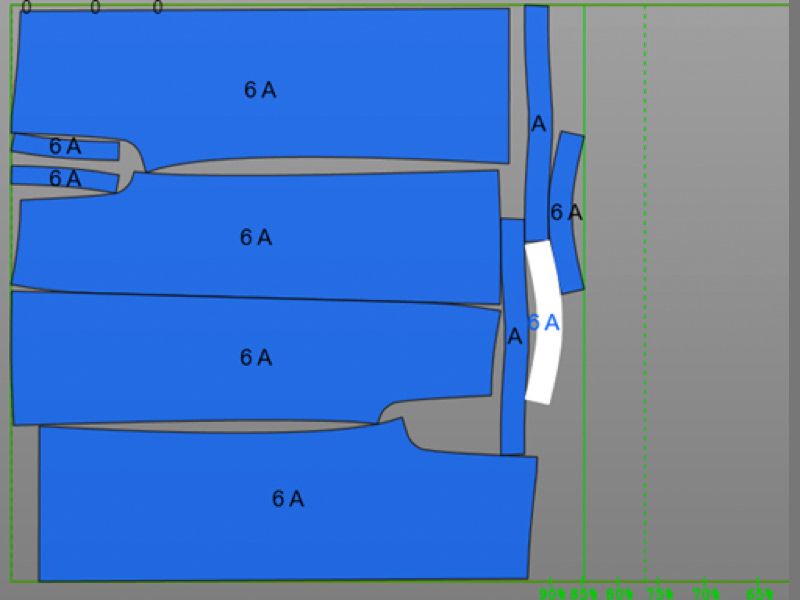
We’re not talking about a drawing instrument here. In apparel pattern making, the marker is a term for the layout of a pattern for cutting. Within a marker, you want the pieces aligned along the grainline, you want a small buffer of space between pieces to ensure that one piece doesn’t end up over cut into another, and you want to do the best you can to optimize how the pieces are laid together for the best material yield and lowest material waste possible. I like to think of marker making as the ultimate game of grown-up Tetris. The better you stack the pieces, the lower your cost and the lower your material waste.
You can see in the marker here, that we’re only utilizing about 77% of our fabric, with the rest going to waste.
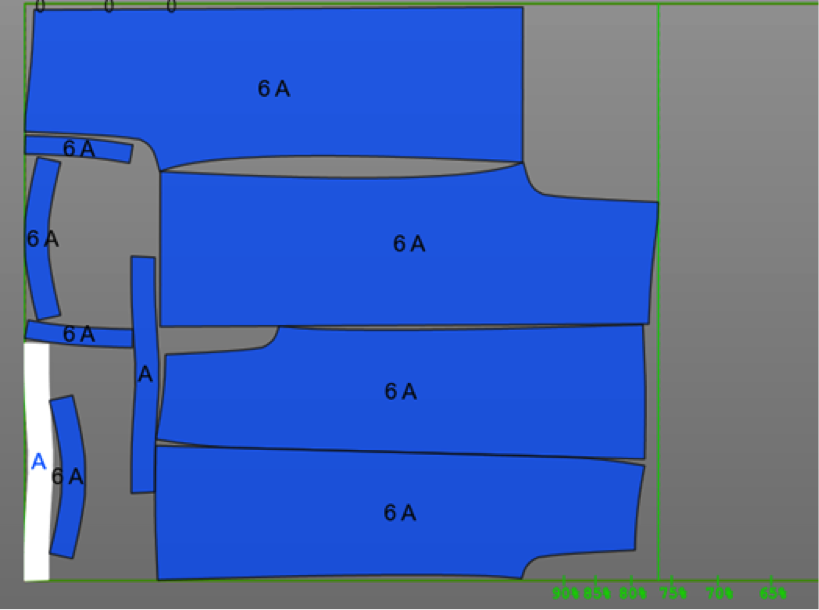
However, by rearranging the pieces in a more optimal layout, we can increase our usage to nearly 85%, saving money on fabric costs and keeping more of our fabric out of landfills.
Perfecting the fit
Once you’ve created your pattern and sewn up your first sample, you’ll have a fitting. You may need to make some fit adjustments. Many things can factor into the pattern not being perfect the first time. Things like the way the fabric drapes, any shrinkage that may occur during the production of the sample, variance in measurements of the wearer to the drafted body, etc.
The most commonly made adjustments are bust adjustments – especially on woven garments – to make darts hit in the proper location. Other common fit adjustments are shoulder slope, rise shape, and neckline adjustments.
These are all part of the normal pattern-making process and can be adjusted on your patterns after fitting.
Darting, pleats, and other fullness
Creating a perfectly tailored garment, especially when using woven fabric, often requires the use of darts, which add fullness to a specific location in a garment. Bust darts are commonly used in women’s wear to create fullness at the apex of the chest while keeping the armhole closely fitted to the body to avoid gaping.
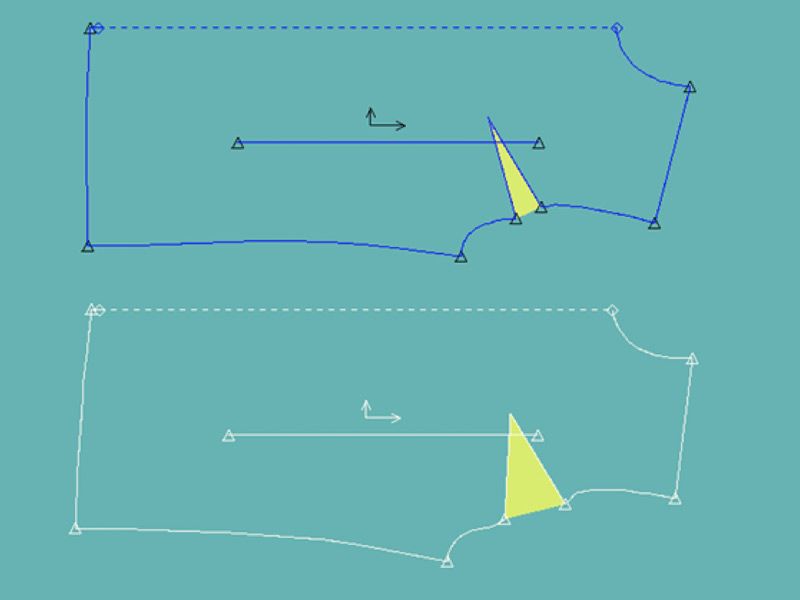
But let’s say you’re starting with a pattern that was drafted for a B cup and you’d like to make a version for a D cup instead. Rather than starting completely over from scratch, you can add to the fullness of the chest and then use a larger dart to maintain your original armscye length.
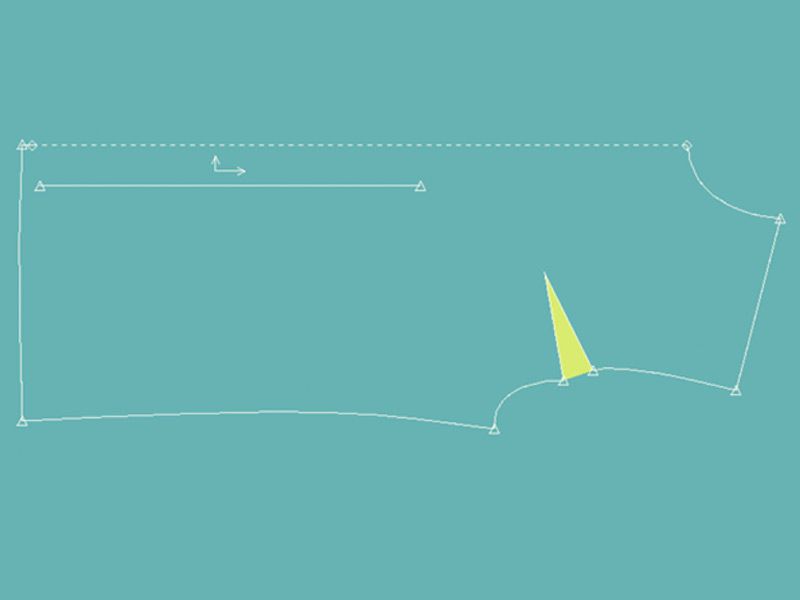
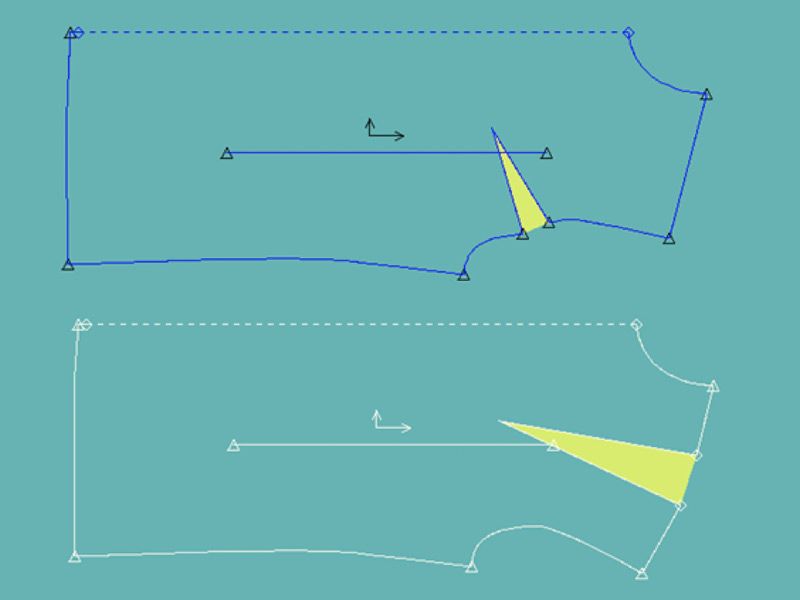
You can also rotate darts to different places to keep the overall fit intact but change the design. By maintaining the dart tip location at the apex point and rotating it to the shoulder, I’m able to keep my fit but have the aesthetic of a shoulder dart rather than a bust dart.
Pleats are another common way to add both fullness and design detail to your garments. There are several different types of pleats, and they are added to your pattern in slightly different ways. Although the way you add fullness to your pattern will vary depending on if you are using a knife pleat, a box pleat, or a tapered pleat, you should indicate the pleat with notches to show where the fabric will join together and a fold line to show where the pleat will be folded.
Gathers and pintucks can also be used to add additional design detail and fullness to a garment. But what if you want to add fullness without changing the very clean visual of your design? That’s where you could utilize the slash and spread method. Slash and spread involve creating a slash line from one edge of your pattern to another, cutting almost all the way through, but not quite. This will allow you to spread the pieces apart, without changing the length of the edge that you didn’t quite cut through, adding fullness to the other end. By using the slash and spread method on my skirt, I’ve maintained my waistline length, but added fullness to the hem going from a more sheath shape to a more A-line shape.
What is pattern grading?
So now your base size pattern is created, fit, adjusted, and perfected! You’re really happy with the final result. But what next? Do you really have to do all of that all over again to create additional sizes? Of course not.
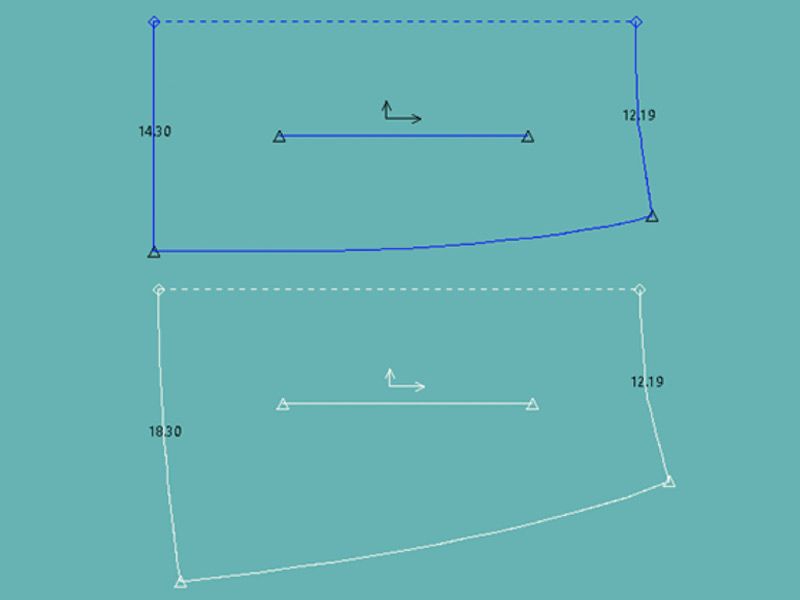
You’ll use what’s called pattern grading to adjust your base size pattern to create the other sizes. There are different methods to grade patterns, but the end result is that you have a consistent visual across sizes. In the end, you’ll end up with a pattern for each size in your range.
|
Ready to centralize your technical design assets? OR Manage your product development to production workflow with factories hastlefree. Try Techpacker. |